My name’s Vlad Negnevitsky, and I’ve been working on OCRA part-time since mid-2019 on behalf of the MRILab at i3m in Valencia, Spain. I’m not an MRI physicist, and I’ll mainly be discussing the technical side of OCRA. OCRA is a multi-level project, bringing together lots of fun engineering at the electronics/hardware, FPGA firmware, embedded software and desktop software/GUI levels, so there are lots of topics to explore.
My background is in experimental trapped-ion quantum computing/information, whose control requirements turn out to be quite similar to MRI – don’t hesitate to reach out if you want to learn more!
Today I’ll talk about a task that’s been on my to-do list for a long time: porting the STEMlab-125 bitstream to the STEMlab-122. To get the most out of this post, you should have some knowledge of FPGAs and the Xilinx Vivado toolchain, the OCRA project, and of course, Git. To learn a bit more about OCRA, have a look here, here (specifically at the history and tree), and here (the documentation’s a bit scattered right now, but will be brought together somewhere soon!). But first, some self-serving history and motivation.
OCRA was originally developed by Thomas Witzel and others for the Red Pitaya STEMlab-125-14, a general-purpose FPGA board with two fast 14-bit ADCs and DACs. Since then, the SDRlab-122-16 has come out, offering a more powerful FPGA chip, two extra ADC bits, and 50-ohm input/output termination [note: the Red Pitaya naming is somewhat fluid, so I’ll just call the two boards the RP-125 and RP-122]. Early on, i3m and I decided to go with the RP-122 for their system, and I ported the existing FPGA firmware to it. Most of my changes were based on the differences between Pavel Demin’s master and 122-16 branches of his ‘Red Pitaya notes’ project, whose FPGA design’s structure and workflow is the original basis for OCRA’s. I also wrote a new server to replace the old OCRA server, which was functional but getting a little bit creaky for ongoing development.
Since the port, some new features have been added to the master (RP-125) branch by Thomas and others, most importantly support for an attenuator chip and a fourth gradient DAC channel on the de-facto standard gradient DAC board we’re using, the OCRA1 developed by Marcus Prier at OVGU. Additionally, David Schote at OVGU is developing a new desktop GUI, GOMRI , which we also want to use, and I’m helping him use our new server in their system. The catch: OVGU is using the RP-125 – so if I don’t make the RP-122 and RP-125 bitstreams as similar as possible now, maintenance of the server code in the future will become a pain as the two bitstreams diverge.
So with that out of the way, let’s begin the latest port (it’s not the first, and naturally won’t be the last)!
Preparation
The HDL folder of the OCRA repo contains all the FPGA bitstream-related files. In particular, the Makefile automates the steps to create a Vivado project, bring in and hook up the various IP cores, and compile the design to produce .bin and .dtbo files, as well as a hardware description file used for building the OCRA SD card Yocto Linux image. If you’re following along at home, you can find basic build notes in my development ocra fork. I’m working from commit ee6a48… .
In my vnegnev/repo_cleanup branch, I have previously removed all the obsolete FSBL/u-boot/Linux files that date back to Pavel Demin’s repo (and are replaced by the Yocto image), and the GUI/server files (still on the mainline master branch, but I’m quite draconian when it comes to Git repos so I deleted them from my cleanup branch too). I also removed some obsolete stuff from the Makefile. Line 9 of the Makefile hasPART_VARIANT ?= Z20, which selects between the Z20 (Zynq ZC7020 FPGA on the RP-122) versus the Z10 (Zynq ZC7010 on the RP-125) variant of the build process. Further down, the Vivado XPR project file is created by
tmp/%.xpr: projects/% $(addprefix tmp/cores_pavel/, $(CORES_PAVEL)) $(addprefix tmp/cores/, $(CORES))
	mkdir -p $(@D)
	$(VIVADO) -source scripts/project_$(PART_VARIANT).tcl -tclargs $* $(PART)
so you can see that either the scripts/project_Z20.tcl or scripts/project_Z10.tcl file is run by Vivado to create a project.
Looking deeper, these two files differ only on lines 16 and 95 [I’m using emacs’s ediff-buffers for all diffs] and select between cfg/ports_[Z10/Z20].tcl and between projects/ocra_mri/block_design_[Z10/Z20].tcl. Spoiler alert: cfg/ports_[Z10/Z20].tcl differ only in two extra pins for the 16-bit ADC on the RP-122. So our task will mostly be to port block_design_Z10.tcl into block_design_Z20.tcl, without breaking the existing changes that enable the RP-122 to run. This isn’t just a matter of copy-and-paste, and it’s worth planning the next steps.
There are two basic approaches one could take: diff the two files and just decide what to port on a block-by-block basis, or look at their common ancestor, see the changes that block_design_Z10.tcl has relative to it, and manually make the changes in block_design_Z20.tcl. The former is faster if it works and we don’t introduce any mistakes, however if it fails then debugging might be quite hard. The latter will take longer and possibly waste some time, but we’re likelier to learn about what every section of the script is doing and avoid needless bugs. As an intermediate approach, I’ll skim-read the diff, see whether I understand the changes, and then decide on my course of action accordingly (Since I originally created block_design_Z20.tcl I’m cheating, but if I were new to the project I’d definitely make changes more conservatively).
Which changes will we adopt?
[SPOILER ALERT] You can see the set of changes I adopted here.
After skim-reading the diff using emacs, I have convinced myself that I understand all the changes, and the bitstream is unlikely to break if I simply follow the second approach, i.e. cherry-picking stuff from block_design_Z10.tcl based on the diff with block_design_Z20.tcl. I won’t discuss all the differences here [for the motivated: create your own diff and have a look!]. Some are simply to accommodate the different system clock frequencies and associated PLL phases of the two boards. Some others are to accommodate the different ADC bit width and cores. Others are associated with IP core version numbers; this is because I updated the versions to suit Vivado 2019.2 a while ago in my fork, then Thomas independently updated his, resulting in a few minor inconsistencies that shouldn’t affect the build. Because I want to minimise the changes in a single commit (commits should be kept atomic, to reduce side effects and make debugging easier), I’ll leave the version numbers in block_design_Z20.tcl alone, and maybe update them in a separate future commit. Then a few are due to slight reorderings of the cores between the files.
Further down, things get more interesting. The first substantial difference is:

This is a difference in the memory map, with the SEG_reader_0 core assigned to a different address of the processing system of the Zynq. This means that in practice, the server must write to a different address in its logical memory space if it wants to feed data to this core. We incorporate this and similar memory map updates from block_design_Z10.tcl into block_design_Z20.tcl.
The next significant difference is the addition of a new core. If you’re playing along at home, guess what it is:

That’s right – it’s the attenuator I mentioned earlier. We want to incorporate it (along with the memory map change to SEG_micro_sequencer).
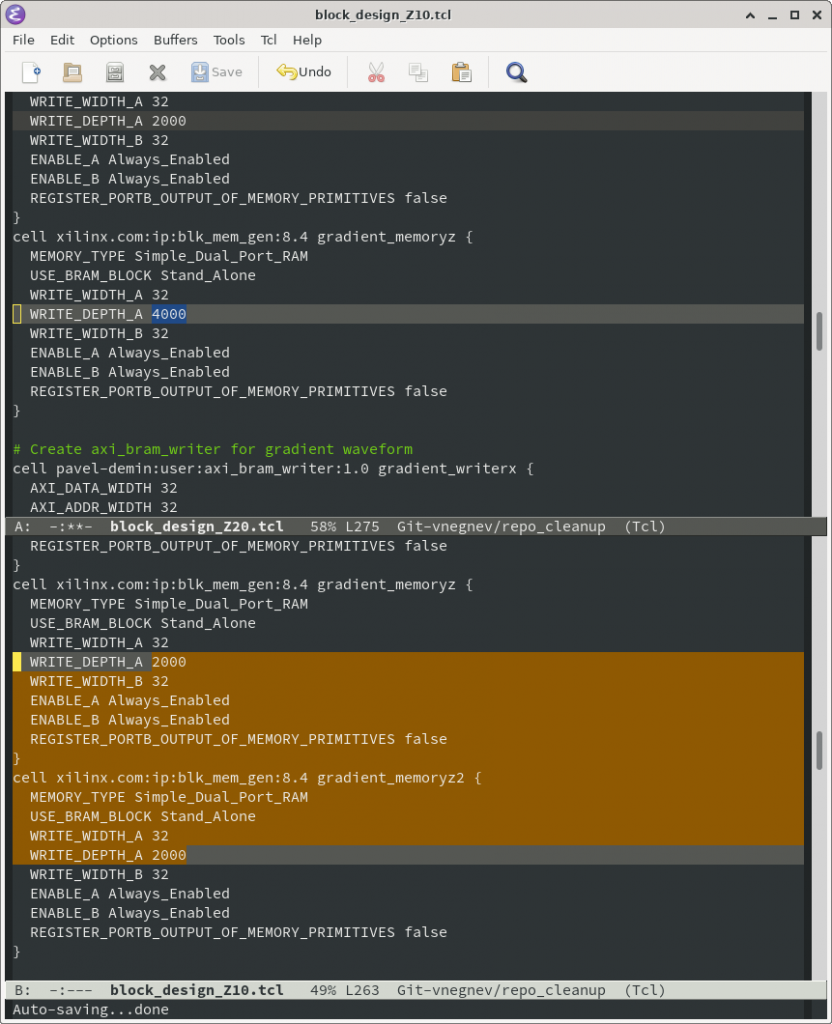
Next come a few changes to the gradient-waveform BRAM sizes; the RP-125 has less FPGA memory available, so for complete compatibility we reduce the BRAM sizes in the RP-122 design. We can always expand them in the future, but for now, compatibility is our overarching goal.
Then comes an extra BRAM for the Z2 channel, which we include:

Next come a few bit-depth reductions for some ‘AXI BRAM writer’ cores. (The OCRA FPGA firmware uses a lot of standalone BRAMs in its block design, each of which requires its own ‘reader’ and ‘writer’ cores. This is, ahem, not exactly standard practice, since instantiating a dual-port BRAM is trivial to do directly in the HDL of the IP core using it, rather than in the block diagram – which would also make the core easier to simulate and verify – but we’re not here to question the choices OCRA has inherited from Pavel Demin’s repos. Maybe in a future blog post!) These are followed by the addition of a BRAM writer core for the new Z2 BRAM, and an apply_bd_automation command to tell Vivado to hook it up to the system bus. More memory map changes follow, along with more Z2 BRAM hook-ups. We’ll adopt all these changes.
Next, a minor rename of a slice, which we adopt:

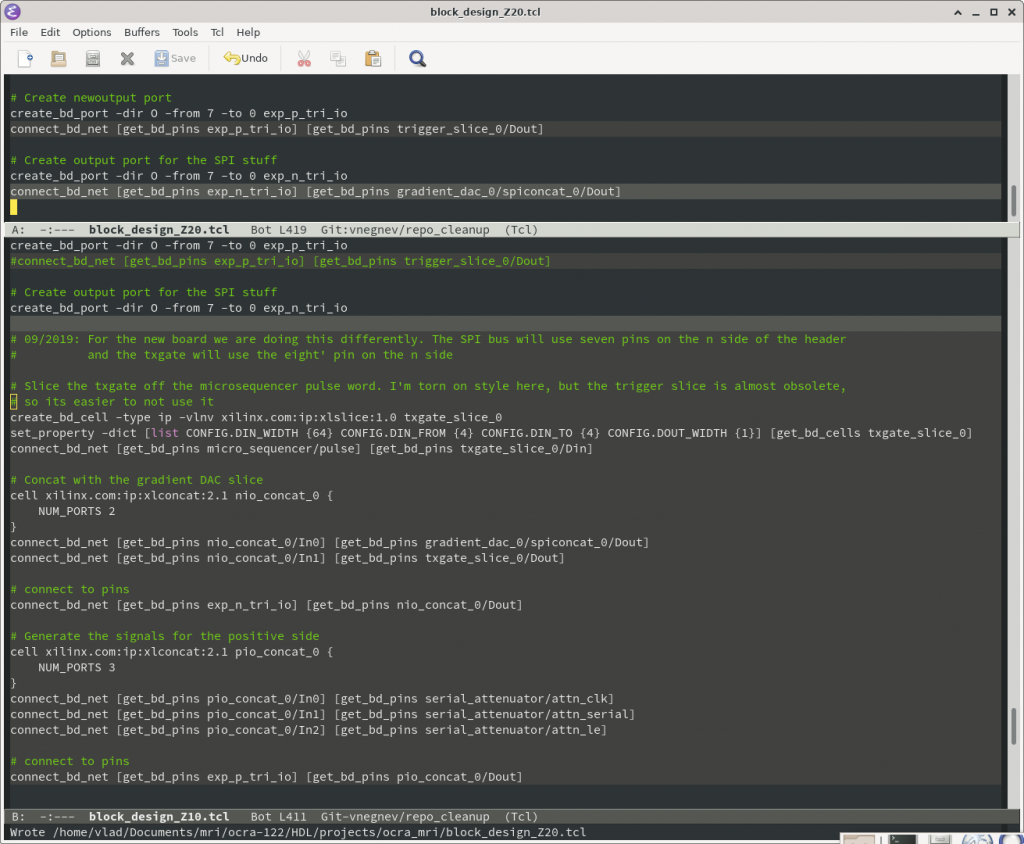
Finally, after another Z2 BRAM-related addition, comes a change in the system pinout:

Between the Z20 and the Z10 versions, the TX gate output is moved to a different pin on the RP header, and the attenuator pins are added. We’ll adopt this change.
And that’s it – we’re done!
Wrapping up
Now I’ll make a provisional commit, then try to compile the Z20 project from scratch and see if there are any problems. UPDATE [30 mins later]: seems to have been fine. The make output is below, in case it’s useful for others to verify their build.
And the commit’s diff can be viewed on Github for reference.
I’ve glossed over a lot of areas, but hopefully this gives some insight into my typical process when porting changes between the various OCRA branches. I’m more used to Vivado projects where the block diagram is a standalone, version-controlled file, but this kind of TCL-based way to generate the project from scratch has various advantages, like reproducibility and ease of porting/merging/etc. For example if the project came with only the final block design, I’d have to manually drag-and-drop for a long time to make the changes I’ve described in this post, and would be much likelier to make a mistake or three. In my opinion, the TCL scripts are still a halfway measure towards an HDL-only design, which would be the purest and most scalable approach – but that’s a personal preference of mine, and HDL-only source code would lose the benefits of Vivado’s automatic AXI bus management, connection automation etc. All three approaches can be made to work just fine.

0 thoughts on “Porting RP-125 FPGA bitstream features to RP-122”